
 So once upon a time I decided to stray from my “pretty dress” trend in Wheel of Time costuming and ended up creating a monster. Literally. A Trolloc is a twisted half human, half beast creature, and I went all out. Since there’s been some interest in how I built the horns and hooves—and I’m a wee bit of a progress pic whore—I have enough photos to write up a tutorial on how to create your own.
 Fancy that!
DISCLAIMER: Despite having won four costuming awards (first, second, and third prize as well as a Judge’s Choice at JordanCon, years 2012-2015), I am self taught.
Read: PROCEED AT YOUR OWN RISK, and YOUR MILEAGE MAY VARY.
The truth is, despite awards, I'm the poster child for just attacking a project willy-nilly. I research, but in the end when I feel ready I hit the ground running and don't look back.
So I’m going to tell you what I tell others: Just do it. Research. Plan. Try. Take notes. Edit. Revamp. Just attack your design and get it done. You can do it.
That's what makes costuming fun: there’s no right way to do anything—just the way that works for you.
So. Step one... Well for me, I hit up Pinterest, googled the shit out of “costuming/cosplay/hooves tutorial," pinned a ton of images and tutorials for inspiration and charged ahead.
This tutorial is a mishmash of what I took from others and made my own. It's going to show you what I did and the pitfalls I discovered. I can’t stress enough: learn from my mistakes, yo.
Materials and tools I used:
- pair of comfortable wedge heeled cork sandals (mine were 5” heels)
- elastic
- fibreglass tape
- newspaper
- painter’s tape/masking tape
- staple gun
- Bondo Body Filler
- palm sander
- can of spray primer
- acrylic paint
- can of satin acrylic spray topcoat/sealant
- epoxy/glue (I used Marine Goop)
- faux fur
- needle and thread
- scissors
First thing’s first. You need your base shoes to build on. An artist and art teacher friend of mine—who likely knows waaaaaay more about what she’s doing than I do (hi, Missy)—recommended I build the hooves separate and then attach them to the shoes. I went with the hard way, because I’m
In my travels online I noticed there was a preference for wedge cork sandals, so when I went thrifting that was what I tried to find. And find I did!
Lots of other tutorials talk of chopping the heel off the sandals, but I opted not to do so. I’m not a big heel girl myself, so walking for any extended period of time would be questionable if I hacked the bottom out from under me, and I was leery of the idea of moving safely in the event of an emergency or hell, just getting around without killing myself.
Point being: find yourself a roomy-yet-comfortable pair of shoes that work for you. I found some platform sandals—the cork bottom made attaching stuff to them easier, so I’d recommend something with a cork base. In later photos you can see I’ve added a white elastic to the strap at the ankle to help them stay on my feet, since I wasn’t going to be lacing these all Grecian-style as per the sandals' original design.

Second step—after de-charming the side of these fancy fancy mothers (snort)—was a trial and error thing on my part and NOT NECESSARY for you. That’s right: learn from my mistakes. Just ignore that I’ve got cloth and chicken wire on the back sandal and go ahead and use fibreglass tape to create the rounded shape of your hoof, stapling the bottom layers to the cork.
Remember to try on your hoof sandals as you go, to ensure there’s room for your toes and the placement of everything is roomy enough for comfort. Stand up, walk around, ensure you'll be comfortable... because what's the point of going to all this trouble if you'll never be able to wear them?
 |
| Fibreglass tape with blue painter's tape underneath. Stuff that with newspaper after you test wear it for comfort. |
NOTE: I did not bring the fibreglass tape all the way to the floor—the hoof is actually angled slightly up at the toe, to allow for natural motion when walking. I'd advise you keep a gap of half a centimetre or so off the floor when designing your hooves. You definitely don't want your hooves to hit the floor and, through the pressure and weight of you walking, break off your sandals.
Next: Bondo! ALWAYS FOLLOW SAFETY PRECAUTIONS (in this case a particularly a well-ventilated area, proper gloves, mask, and googles) AND READ INSTRUCTIONS.
From what I can tell Bondo is used in bodywork repair on cars, and badass costuming. It’s a putty that comes with a hardening agent that needs to be mixed on the spot, and gives you very little leeway for workability, so make sure you’re ready to go and have all your gear in place before you mix the two together. I can't stress enough: read the instructions fully before beginning.
I highly recommend finding costuming tutorials using Bondo on YouTube and watching the shit out of them before proceeding. That'll give you a good idea of the pitfalls and workability of this stuff before you tackle your own project.
 |
| Finished Bondo sandals... not winning any beauty competitions. Test wear these puppies before proceeding. |
This here is the step that feels like a complete shit show as it’s happening, but hit it with gusto and trust. Goop that stuff onto your fibreglass tape and mess it around into the generic shape of a hoof, watching that the shape doesn't distort as you add weight to it. You’ve got two to four minutes of work time with Bondo before it hardens like rock. If you notice it’s not smearing as smoothly, just let it sit and add another layer of Bondo later. I recommend two or three thinner coats of Bondo to get the look you want, so don’t worry if it’s not pretty at first.
After the Bondo has cured (check instructions for precise details), you’re going to want to sand it. Again, I can’t stress enough: do this in a well ventilated area, and with proper equipment (mask, goggles). I used a circular palm sander, and it took about an hour to get these bad boys looking how I wanted. Remember to not only smooth out the shape of your overall hooves, but flatten the bottom edges, and the opening for your foot so it won't scratch you as you walk.
 |
| Sanded hooves. |
 |
| Painted hooves. |
Once I had the paint the way I wanted, I sealed it with a satin acrylic topcoat.
NOTE: It's easier to see the gap between the toe edge of the hooves and the tabletop in these photos.
 |
| Hooves with acrylic topcoat sealant. |
Once that has set, you’ll want to cut your faux fur in such a way that you can wrap it all the way around the hoof as well as around the back of your foot, and leave enough room to sew it together later at the heel. Which really means: a big freaking rectangle is probably fine, and remember you can cut extra off later, but it’s more difficult to add to it if you underestimate. Remember to angle your fur so it covers any cork heel that may be showing—for my sandal I planned on shaggy fetlocks as camouflage for that heel I refused to cut out from under myself.
Using the epoxy and proper safety measures (googles, mask, and well ventilated area again), glue the faux fur onto your hooves as per the epoxy’s instructions. I used Marine Goop, thanks to some advice of a professional costuming friend (hi, Paul!), who said I needed to find an epoxy that specifically bonds something rigid to something flexible. That narrowed down the search considerably, and since Marine Goop states it is specifically good for, well, everything boat, it included on its list both canvas and fibreglass, and I figured faux fur and Bondo Body Filler would mimic those two items nicely.
 |
| Furry hooves. The badass point of no return—right about here I knew the results of these bad boys would be ah-mazing. |
Don’t forget, once they’ve cured, to put them suckers on and stomp around with glee because, damn, you’re gonna have hooves, friend!
 |
| Stomp. Stomp. Stomp. |
Next you’re going to want to trim down the fur. I used a pair of scissors and a remarkable amount of patience. I recommend doing this outside so that it doesn’t look like wild animals fought to the death in your living room.
 |
| Patience and tiny scissors, friends. Patience and tiny scissors. |
I preferred the look of shaggy hooves, and trimmed accordingly. Then, after measuring and checking for fit, I trimmed excess faux fur and hand sewed up the back of the heel, just a loop stitch on the inside.
That's IT! Hooves done! Now go stomp around and show them babies off!
For my own project, I had a bit more to do. Since I was planning on wearing these hooves with a skirt, I wanted a way to hide where my furry hooves ended and where my leg began, so I designed suede leg wraps. They aren't particularly necessary, though, it all depends on the look you're going for.
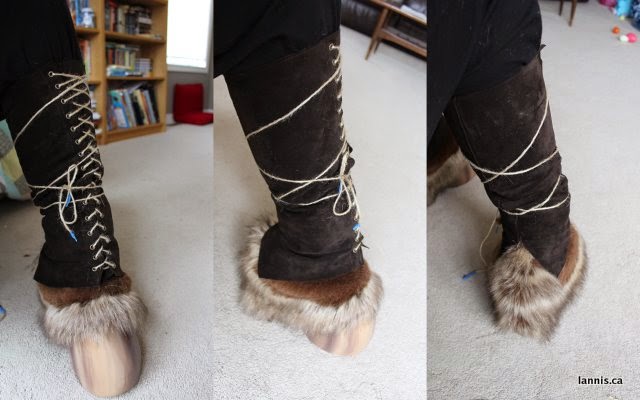 |
| Leg wraps to camouflage the calves. |
Overall my hooves were very comfortable, and my only issues with them stemmed from not being a big heel girl to begin with. After wearing them for four hours my feet were sore, but they would've been in any heels I wore for that length of time simply due to my preference for flats. Will I wear them again? Hell yes. Nargella the Trolloc was a hit, and she'll be gracing JordanCon again, for sure.
 |
| Nargella the Trolloc. Eating, er, breaking hearts and towering over pesky humans. |
This is a wonderful detailed instruction.
ReplyDeleteYes, I'd seen it before, in your "Secret Album" (& I heart that SO much) but the extra instructions here make for a "hey, I could probably manage that magic myself"
Thanks!!